iPhone Rear Camera Repair Price 2024 - Orange County Introduction Greetings from Phonebulance, your trusted partner...
Rear Camera Replacement
When you face damage to your iPhone, you need immediate repairing, and if you postpone it, the damage will spread to the other parts. This matter applies to rear camera replacement too. If you have a problem with your rear camera or your camera is damaged, fix it immediately.
Here, we are going to give you nine essential tips for replacing a rear camera. They are all practical for rear camera replacement iPhone 6s plus, back camera replacement iPhone 11, and other models. When you or any other technicians want to do the back camera replacement iPhone 6s plus and later, the process of removing the screen to do the reserve is very technical and fragile. So we will focus on this part and give you some advice to do it right and prevent further damage.
1- First of all, turn off the iPhone before disassembling it. Remove the two 6.7 mm pentagonal screws on the bottom edge of the iPhone. Opening the iPhone screen will affect the waterproof performance. Before proceeding with this, please prepare a spare seal, or if you did not replace the seal when assembling the rear camera replacement iPhone XR, avoid liquid contact.
For back camera replacement, heating the bottom edge of the iPhone will loosen the adhesive that fixes the screen. Easy to open. Use a hairdryer or heat gun, or prepare an iOpener and place it on the bottom edge of the iPhone for about a minute.
2- The plastic depth gauge is located in the middle of the iSclack. Delete it now. Rear camera replacement iPhone 7 plus and rear camera replacement iPhone xs max do not need this feature because they are large iPhones. Place the suction cups near the bottom edge of the iPhone, one on the front and the other on the back. Press the two suction cups firmly.
3- Hold the iPhone firmly and close the iSclack handle to separate the screen from the phone’s back quickly. Don’t try to split the screen entirely. You only need to leave a small hole on the bottom edge. Insert the paddle into the slot at the bottom of the iPhone under the screen to open it for Rear Camera replacement.
If you use a single suction handle, place it on the phone’s bottom edge, avoiding the curved part of the glass. If the filter is severely torn, cover it with a layer of transparent packaging tape to make the suction cup stick while rear camera replacement iPhone x or you can use very sticky tape instead of suction cups.
4- If all other methods are ineffective in the rear camera replacement iPhone 7, you can connect the suction cup to the damaged filter. Using solid and constant pressure, lift the suction cup to create a small gap between the front baffle and the back cover. Insert the acne into the hole. The sealant that holds the screen is very durable; creating this initial gap requires a lot of effort.
If you have trouble opening the gap in the rear camera replacement iPhone 8, apply more heat, and then gently move the screen up and down to loosen the adhesive until there is enough room to insert the tool.
5- The openings in the lower-left corner and above the left edge of the iPhone in Rear Camera replacement can pass through the adhesive that holds the screen in place. Do not insert the release lever too profoundly into the iPhone; otherwise, it will damage the internal components. Select the bottom edge in the rear camera replacement iPhone 11 and slide it to the right to peel off the adhesive further. Don’t push the paddle too far. Otherwise, the display cables on both sides of the iPhone may be damaged. Insert it only a few millimeters or the width of the display frame.
6- If necessary, pull the screen further down (toward the Lightning connector) to leave a large enough gap for the lock option. Slide the pimples to the upper left corner and cut off any remaining glue holding the rear camera replacement iPhone XR screen. Do not insert the pick more than a few millimetres in width, which is about the same as the display bezel width. Otherwise, the Face ID sensor array may be damaged in the back camera replacement process.
7- Don’t try to turn off the display entirely while rear camera replacement iPhone x because it is still connected to the iPhone’s motherboard via multiple fragile ribbon cables. When reassembling, fix the screen in place, align the fixing clips with the top edge, and lightly press the leading edge. Clamp around the screen and make sure they are not bent.
8- During this maintenance period for rear camera replacement iPhone xs max, please pay close attention to each screw to ensure that it is wholly returned from its original position. During the assembly process, it is time to turn on the iPhone and test all its features. Before proceeding, make sure to turn off the iPhone completely. Be careful not to damage the black silicone gaskets surrounding these and other connectors on the board. These seals provide additional protection against the ingress of water and dust. Bend the connector slightly away from the motherboard to avoid accidental contact with the connector and avoid causing more damage with rear camera replacement.
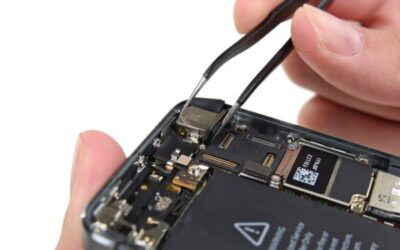
9- To reattach the camera cover for back camera replacement iPhone 7 and later models: first, lower the outer edge until the two protrusions protruding from the camera cover are fitted into the holders on the outer edge of the camera module. Then close the flip cover. Will not flatten the surface until the two latches are installed correctly. Use a spudger or nail to pry up the two cable connectors to pry them away from the camera. Insert the tip of the spatula into the lower right corner of the camera between the camera part and the iPhone frame.
iPhone Rear Camera Repair Price 2024 - Orange County Introduction Greetings from Phonebulance, your trusted partner...
What to do before phone repair | All you need to know before repairing your phone It has happened to all of us that...
Deciding to buy a new phone is not an easy task, as it requires money. In many cases, repairing a phone can solve the...
iPhone XR front camera lens replacement tips Buying iPhone XR is not the last step of spending money. You must always...
Can scratches on the camera lens be fixed? Scratches from the camera lens of a phone can reduce the quality of the...
Different things may make the telephone overheat and be the answer to "Why my Samsung galaxy note is getting hot"; for...
Do you need to get your iPhone repaired as quickly as possible? Cellphones nowadays play a huge role in our everyday...