

Is your iPhone camera stuck on a black screen? Are your photos suddenly blurry, or is the camera app freezing every time you try to capture a moment? As a busy iPhone owner in California, you rely on your phone’s camera every day, and a malfunction can be a major headache.
Before you book a costly appointment or send your device off for repair, you should know that the vast majority of iPhone camera issues are software-related—problems you can fix yourself in minutes. Hardware failure is often the last stop, not the first.
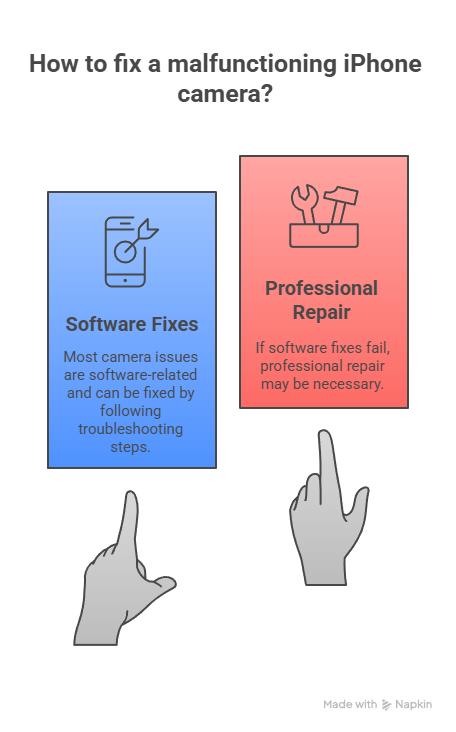
This comprehensive guide, written by an expert technician, walks you through the 7 most common, effective, and non-destructive troubleshooting steps to get your camera working again. We’ll start with the simplest checks and move toward deeper software resets. By the end, you will know exactly whether your issue is a simple glitch or requires professional attention.
Key Takeaways at a Glance
1. The Quick Reset: Force-Close the Camera App
If you open the Camera app and see nothing but a black screen, or if the shutter button is unresponsive, the app itself may have frozen. This is the fastest, easiest, and most common fix.
How to Force-Close the App
- Open the App Switcher: Swipe up from the bottom of the screen and pause in the middle (for iPhones without a Home button) or double-press the Home button (for older models).
- Locate the Camera App: Find the Camera app preview card.
- Swipe Up: Flick the Camera app preview up and off the screen to force it to close completely.
- Relaunch: Wait about 10 seconds, then tap the Camera app icon to re-open it.
Expert Tip: While in the App Switcher, it’s a good practice to swipe away any other open apps you aren’t actively using. Too many apps running in the background can hog resources and lead to performance issues, including camera freezing.
2. The Universal Fix: Force Restart Your iPhone
When a simple close doesn’t work, the next step is to perform a force restart (often called a “hard reset”). This clears the temporary system memory (RAM) and resolves deep-seated software conflicts or glitches without erasing any of your personal data, apps, or photos.
How to Force Restart (iPhone 8, SE 2nd Gen, and Newer Models)
This sequence must be done quickly:
- Press and Release Volume Up: Quickly press and release the Volume Up button.
- Press and Release Volume Down: Quickly press and release the Volume Down button.
- Press and Hold Side Button: Press and hold the Side (Power) button.
- Wait for Logo: Continue holding the Side button until the screen goes black, and the Apple logo reappears (this can take up to 15-20 seconds).
- Release: Release the Side button and let the phone restart fully.
If you have an older iPhone, search our site for Force Restart Instructions for iPhone 7 and Older Models.
3. Physical Check: Clean the Lens and Remove Obstructions
Sometimes, the issue isn’t software at all—it’s physical. If your photos are coming out blurry, spotty, or completely dark with a black screen, check the outside of your device.
Actions to Take:
- Clean the Lens: Gently wipe the front and back camera lenses with a clean microfiber cloth. Fingerprints, pocket lint, or smudges can severely impact clarity and focus. Avoid using paper towels or abrasive materials, which can scratch the lens.
- Check the Case/Protector: Remove your phone case and screen protector. A thick or misaligned case, or a lens protector that has shifted, can partially or totally obscure the camera, especially the flash or a specific lens (like the Ultra-Wide on newer models).
- Remove Metallic Accessories: If you use magnetic phone accessories, a metallic case, or a lens attachment, remove it. These items can interfere with the camera’s optical image stabilization (OIS) system, leading to blurry, unfocused shots.
4. Software Integrity: Update iOS and Check Storage
Outdated software is a common cause of unexpected bugs. Apple frequently includes camera-related patches and bug fixes in iOS updates.
A. Check for iOS Updates
- Go to Settings General Software Update.
- If an update is available, tap Download and Install. Ensure your iPhone has at least 50% battery or is plugged into a charger.
B. Verify Available Storage
A lack of storage space can cause the Camera app to freeze or fail to save photos, making it seem broken.
- Go to Settings General iPhone Storage.
- If your storage is nearly full (e.g., less than 1GB remaining), the Camera app may fail to launch. Follow the recommendations here to offload unused apps or learn how to clear system data on iPhone.
5. Isolate the Problem: Test the Camera in Other Apps
To quickly determine if the issue is with the default Camera app or the camera hardware itself, try using the camera within a third-party application.
- Test 1: Use FaceTime/Messages: Open the FaceTime app or the Camera feature in Messages. Try switching between the front and rear cameras in these apps.
- Test 2: Use a Third-Party App: Open an app like Snapchat, Instagram, or a third-party camera app from the App Store.
The Diagnosis:
If the camera works in a third-party app: The issue is almost certainly a software glitch or incorrect settings within the native Apple Camera app. Proceed to Fix 7 (Reset All Settings).
If the camera does NOT work in any app (black screen persists): The problem is likely a deeper software issue or, potentially, a hardware failure.
Check Camera Permissions
If a specific third-party app can’t access the camera, ensure you haven’t accidentally disabled its permissions.
Go to Settings Privacy & Security Camera.
Find the app in the list and ensure the toggle switch is ON (green).
6. The Battery Factor: Turn Off Low Power Mode
Low Power Mode is great for preserving battery life, but it intentionally throttles performance and disables non-essential features, sometimes including the full functionality of the camera. If your camera is lagging or struggling with advanced features (like Portrait mode), Low Power Mode might be the culprit.
Go to Settings Battery.
Toggle the Low Power Mode switch to the OFF position (gray).
Relaunch the Camera app and test its performance.
7. Deep Software Cleaning: Reset All Settings
If you have tried everything above and the camera still won’t work, the issue may be a corrupted or incorrect configuration file in your iPhone’s settings. This fix resets all personalized settings (Wi-Fi passwords, notification preferences, home screen layout) back to default, but it will NOT erase your apps, photos, or personal data.
Warning: Only use the Reset All Settings option. DO NOT select “Erase All Content and Settings,” as this performs a factory reset and wipes your entire device.
How to Reset All Settings
Go to Settings General.
- Scroll down and tap Transfer or Reset iPhone.
- Tap Reset Reset All Settings.
- Enter your passcode to confirm and tap Reset All Settings again.
Your iPhone will restart, and you will need to reconnect to Wi-Fi and set up things like Face ID/Touch ID again. This is often the final software step before confirming a hardware problem.
Is it a Hardware Issue? When to Seek Professional Repair
If you have performed all seven of the fixes above and your camera still exhibits one of the following symptoms, it is highly likely that your iPhone requires professional repair:
- Consistent Black Screen: The screen is completely black, and the camera will not switch between front/rear (or only one camera works).
- Rattling Noise: You hear a slight rattling or grinding sound when holding the phone. This often indicates a loose or damaged lens component inside the camera module.
- Visible Physical Damage: The camera lens glass is cracked or has an impact point.
For iPhone owners across California, getting a quick, reliable camera repair is essential. Our certified technicians specialize in genuine, high-quality component replacement, ensuring your photos are back to their original quality quickly.
Don’t wait and risk missing more memories. If your camera is still not working, it’s time for the experts.

Phonebulance is your one-stop center!
Want to get the most out of your iPhone? At Phonebulance, we’re your one-stop center for all things smartphone! Whether you’ve cracked your screen, dropped it in water, or it’s simply acting sluggish, our certified technicians can diagnose and fix a wide range of issues. Contact us today or make an online appointment to learn more about our services and keep your smartphone connected and functioning like new!
Here is the list of our smartphone repair services:
- Apple iPhone
- Apple Watch
- Apple iPad
- Apple iPod
- Samsung Galaxy S Series
- Samsung Galaxy Note Series Samsung Galaxy Tab
- Google Pixel and Nexus
- OnePlus
- Other brands (LG, Motorola, HTC, Blackberry…)
Here is the list of our repair and fixing prices:
- iPhone LCD Screen Replacement
- iPhone Charging Port Replacement
- iPhone Battery Replacement (High Capacity)
- iPad screen replacement
- iPhone Back Camera Lens Replacement
- iPhone Rear Camera Repair
- iPhone Back Glass Repair Cost
Service Areas in Orange County South:
0 Comments