

That heart-stopping moment. Your precious iPhone slips from your grasp and lands with a sickening splash in the pool, the sink, or worse… the toilet. Panic sets in. It’s a modern-day nightmare, especially for iPhone owners in California where our lives are so connected to our devices. But don’t despair just yet.
Acting quickly and, more importantly, correctly in the first few minutes can make all the difference between a full recovery and a costly paperweight. This guide is your emergency first-aid manual. We’ll walk you through the proven steps for saving a water-damaged phone, debunk the dangerous myths you’ve seen online, and help you understand when it’s time to call in a professional.
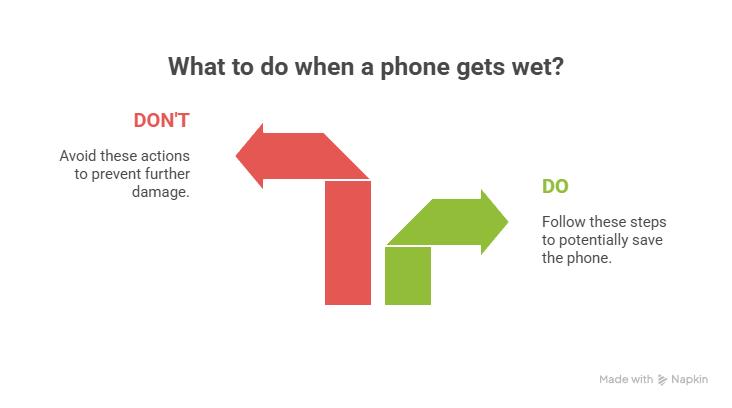
Key Takeaways at a Glance
| Do’s (Your Immediate Actions) | Don’ts (Avoid These at All Costs) |
| Power it off IMMEDIATELY. | Do NOT turn it on or charge it. |
| Remove the SIM card tray. | Do NOT use uncooked rice. |
| Gently pat the exterior dry. | Do NOT use a hairdryer or heat source. |
| Place it in a dry, ventilated area. | Do NOT shake or hit the phone. |
| Call a professional for assessment. | Do NOT plug in any accessories. |
First 60 Seconds: Your Immediate Action Plan for a Wet Phone
What you do in the very first minute after your phone falls in water is the most critical part of the entire rescue operation. The goal is to cut off all electricity to prevent a short circuit, which is what causes permanent damage.
- Get it Out of the Water Immediately: This sounds obvious, but every second submerged increases the amount of liquid that can seep inside.
- Power It Off NOW: If the phone is still on, turn it off immediately. Do not wake the screen to check for notifications or see if it’s working. If the screen is black, resist the temptation to turn it on. This is the single most important step to prevent electrical short-circuiting on the main logic board.
- Position it Upright: If your iPhone was submerged, hold it so the charging port faces down to allow any water inside to drain out through the openings it entered.
Think of it like this: water itself isn’t the instant killer for electronics; it’s the combination of water and electricity. By powering it down, you’ve just performed emergency CPR.
The Step-by-Step Guide to Drying Out a Wet Phone Safely
Once you’ve completed the immediate actions above, it’s time to start the careful process of drying your device. Remember, patience is your best friend here.
Step 1: Power Down and Disconnect Everything
We’ve already covered this, but it’s worth repeating. If you haven’t already, hold down the power button and slide to power off. If the screen is unresponsive, perform a hard reset to shut it down. Once off, do not attempt to turn it back on until you are 100% sure it is dry, which can take 48 hours or more. If you had it plugged in, unplug it safely.
Step 2: Remove External Components
Your next job is to open up any and all ports to aid in ventilation and drying.
- Remove the SIM Card Tray: Use a SIM ejector tool or a small paperclip to pop out the SIM tray. This creates a crucial opening for air to circulate and moisture to escape.
- Remove any Case or Accessories: A bulky case can trap moisture against the phone’s body and in its ports. Take it off immediately.
Step 3: Gently Dry the Exterior
Use a soft, lint-free cloth (like a microfiber cloth used for cleaning glasses) to gently pat the entire exterior of the phone dry. Pay close attention to the seams, buttons, and ports. Do not use a paper towel or tissue, as these can shred and leave behind tiny particles that can cause more problems inside the ports.
Step 4: Promote Airflow (The Right Way)
Now that the outside is dry, you need to help the inside dry out. The best method is simple: evaporation through air circulation.
- Find a good spot: Place the phone in a dry, well-ventilated area. In front of a cool fan is an excellent option, as the moving air will significantly speed up evaporation.
- Position it correctly: Stand the phone upright, leaning against a book or wall, with the charging port facing down. This allows gravity to help any remaining droplets drain out.
- Wait… and then wait some more: You must let the phone dry for at least 24 to 48 hours. Trying to power it on too soon is the most common mistake people make, and it often delivers the final, fatal blow to the internal circuitry.
While you’re waiting, it might be a good time to review how to back up your iPhone so you’re prepared for any future incidents.
Debunking the Myths: What NOT to Do When Saving a Water-Damaged Phone
The internet is filled with well-meaning but terrible advice. Following these common “hacks” can cause irreversible damage and turn a salvageable phone into a lost cause.
The Uncooked Rice Myth: Why It Does More Harm Than Good
This is the most persistent and damaging myth. The idea is that rice absorbs moisture. While technically true, it’s incredibly inefficient and creates bigger problems.
- It’s Ineffective: Rice can only absorb liquid it’s in direct contact with. It does absolutely nothing for the moisture deep inside your phone’s components.
- It Causes Contamination: Tiny particles of rice dust, starch, and grit can get into the charging port and other crevices, causing clogs and corrosion. Professional repair technicians often say cleaning rice dust out is one of their most annoying tasks.
- It’s a Distraction: The rice myth gives people a false sense of security, causing them to delay taking proper, effective action.
Verdict: Do not use rice. Ever. Airflow is far more effective and doesn’t introduce new contaminants.
The Hairdryer Hazard: Don’t Apply Heat!
Your first thought might be to speed up drying with a hairdryer, but heat is a major enemy of your phone’s delicate electronics.
- Heat Damages Components: Excessive heat can melt solder points connecting crucial components to the logic board. It can also damage the battery and warp the sensitive OLED or LCD screen.
- It Pushes Water Deeper: The forced air can actually blow droplets of water further inside the device, spreading the problem to areas that might have otherwise stayed dry.
The Shaking Mistake: Why It Spreads the Damage
In a panic, it feels natural to shake the phone to get the water out. Don’t do it. Shaking a wet phone is like shaking a bottle of soda before opening it—it just spreads the liquid to every possible corner, increasing the chances of a catastrophic short circuit.
How to Check for Damage: The Water Damage Indicator
Most iPhones have a built-in Liquid Contact Indicator (LCI) to show if the device has been exposed to moisture. You can check this yourself.
- Location: The LCI is located inside the SIM card slot on modern iPhones.
- How to Check: After removing the SIM tray, shine a light into the slot.
- What to Look For: A normal LCI is white or silver. If it has been activated by liquid, it will turn bright red or pink.
An activated LCI is a clear sign that water got inside. While your phone might still work, this can void your warranty and is a strong indicator that you should seek a professional diagnosis to check for hidden corrosion. You can learn more about this directly from Apple’s official support page.
DIY vs. Professional Repair: When to Call for Help
You’ve followed all the steps, you’ve waited 48 hours, and you’ve taken a deep breath before pressing the power button. What happens next determines your next move.
- If it turns on and works perfectly: You got lucky! Monitor it closely for a few days. Sometimes, issues from slow-forming corrosion can appear later. This is a good time to back up all your data immediately.
- If it turns on but acts strangely: You might see screen discoloration, glitching apps, or muffled audio. This means some internal components are damaged.
- If it doesn’t turn on at all: The damage is likely significant and located on the main logic board.
In the last two scenarios, a DIY fix is no longer an option. The water inside your phone contains minerals that, once the water evaporates, leave behind deposits that cause corrosion. This corrosion acts like a cancer for electronics, slowly eating away at the delicate connections. A professional can open the phone, use an ultrasonic cleaner with isopropyl alcohol to properly clean the logic board, and replace any components that have been shorted out. For an in-depth look at this process, sources like iFixit provide excellent technical explanations.
For iPhone owners in California, you need a reliable, fast service. You can’t afford to be without your device. While the DIY steps are crucial first aid, they don’t remove the corrosive minerals left behind. Only a professional cleaning can do that, truly saving a water-damaged phone for the long term. This is especially true for complex devices like iPhones, where specialized tools are needed just to open the case. Trying to fix common iPhone repair issues yourself can often lead to more damage.
Conclusion: Giving Your Phone the Best Chance of Survival
Dropping your phone in water feels like a disaster, but it doesn’t have to be a death sentence for your device. By immediately powering it off, drying it externally, and allowing it to air dry properly for at least 48 hours, you give it the best possible chance of a DIY recovery.
Remember to avoid common myths like rice and hairdryers, which do far more harm than good. However, it’s crucial to recognize that even if the phone turns back on, hidden corrosion could be a ticking time bomb. The only way to be certain your phone is safe and to prevent long-term failure is with a professional inspection and cleaning.
Don’t leave your iPhone’s fate to chance. For a guaranteed, professional repair that addresses hidden corrosion and component damage, it’s time to call the experts.
Is your phone still not working or acting strange after a water incident? The Phonebulance team is ready to help. Click here to schedule your expert repair appointment or give us a call today!
Frequently Asked Questions
How long does it take for a water-damaged phone to dry?
You should wait a minimum of 24 to 48 hours before attempting to turn your phone back on. However, this only allows the water to evaporate; it doesn’t remove the corrosive mineral deposits left behind, which can cause long-term damage.
Can a water-damaged phone be truly fixed?
Yes, in many cases it can. A professional repair technician can disassemble the phone, clean the internal components with specialized solutions to remove all corrosion, and replace any short-circuited parts. This is far more effective than any DIY method.
Does putting a wet phone in the freezer work?
No, this is another harmful myth. Freezing the water can cause it to expand, which can permanently damage delicate components and crack solder joints on the logic board. When it thaws, you’re right back where you started, but with potential new damage.
My iPhone is water-resistant. Do I still need to worry?
Yes. Modern iPhones are water-resistant, not water-proof. This resistance is rated for specific conditions (like a certain depth for a limited time in fresh water) and degrades over time as the adhesive seals wear down. Exposure to salt water, chlorinated pool water, or soap can compromise these seals much faster. Always treat any significant water exposure as an emergency.

Phonebulance is your one-stop center!
Want to get the most out of your iPhone? At Phonebulance, we’re your one-stop center for all things smartphone! Whether you’ve cracked your screen, dropped it in water, or it’s simply acting sluggish, our certified technicians can diagnose and fix a wide range of issues. Contact us today or make an online appointment to learn more about our services and keep your smartphone connected and functioning like new!
Here is the list of our smartphone repair services:
- Apple iPhone
- Apple Watch
- Apple iPad
- Apple iPod
- Samsung Galaxy S Series
- Samsung Galaxy Note Series Samsung Galaxy Tab
- Google Pixel and Nexus
- OnePlus
- Other brands (LG, Motorola, HTC, Blackberry…)
Here is the list of our repair and fixing prices:
- iPhone LCD Screen Replacement
- iPhone Charging Port Replacement
- iPhone Battery Replacement (High Capacity)
- iPad screen replacement
- iPhone Back Camera Lens Replacement
- iPhone Rear Camera Repair
- iPhone Back Glass Repair Cost
Service Areas in Orange County South:
0 Comments